Re-using old stop tabs in Virtual Pipe Organ consoles
Colin Pykett
Posted:
1 May 2014
Revised:
1 May 2014
Copyright © C E Pykett 2014
This
short
article describes how to remove the engraved characters from old organ stop tabs
so they can be re-used on another console, such as that for a DIY virtual pipe
organ. The method can result in a considerable cost saving in view of the
expense of buying new items, because even blank tabs are expensive today, let alone
engraved ones. Note that the use of machine tools is suggested, although
equivalent manual methods are also described.
If you decide to use such tools you must ensure you are fully conversant with the safety aspects of doing so, that you have read the instructions for using them, and that you have sufficient experience.
It is emphasised that you use the material here entirely at your own risk.
From time to time I have re-used old stop key tabs by removing the existing engraving and then re-engraving them
if necessary to suit the new specification. As this is a relatively common
requirement it might be useful to describe how I undertake this operation, as it is often worth considering on account of the cost of new
tabs. Even without engraving, i.e. in the form of blanks, these cost typically around
5 GBP each at the time of writing (2014). Another reason is that sometimes the tabs are of a style no longer obtainable, and in these cases the cost of a few new ones of non-standard design will be astronomical. It should be noted that what follows is only suitable for
use on flat plastic surfaces, not convex ones
such as those on draw stop knobs or on the 'elephant tusk' type of tab used at one time by Walker's.
However it might be possible to apply the method to Compton's stop tabs of the first half of
the twentieth century, though I have not tried it on these myself. Also it is desirable that the tabs be of solid material, not hollow underneath. In these cases there may be insufficient material thickness to allow for re-engraving once the existing lettering has been removed. Ivory can also be treated in the manner to be described, though it is rarely encountered on stop tabs and
it is also extremely valuable today. Variants of the method can also be used for both ivory
and plastic keys as well as stop tabs, and
an abrasive method similar to that described is usually the only way of
permanently removing the yellowing from old
ivory keys.
It is assumed that the existing legends are actually cut into the material rather than
merely printed onto the surface, or in the form of transfers such as Letraset.
In these cases metal polish or kitchen cleaner such as Cif will usually suffice. But with
machine-engraved characters the depth of engraving will typically be some significant fraction of a
millimetre, so simply rubbing the tab with
a mild abrasive will not be adequate. An amount of material has to be removed equal to the depth of engraving, while keeping the
new surface flat, free from damage and restoring it to a near-perfect mirror
sheen. This is a tall order.
The first step is not for the faint of heart. You have to rub the tab with coarse glass paper until the existing lettering has almost vanished.
For ease of effort this is best done using a belt sander, though it can be achieved
just as well by rubbing the tab manually on a piece of coarse glass paper on a perfectly flat surface. A piece of MDF is good for flatness. Any bumps or
uneven-ness at this stage will at best involve much painstaking work to remove the resulting deep scratches, and at worst it can ruin the job completely. Work in bright light. Do not use too much pressure, and only remove the minimum of material. Do not under any circumstances let the material heat up or you will get into a fine
mess, and it might even catch fire. Stop when one or two faint vestiges of the existing
characters can still just be seen. From time to time examine the tab to ensure you are not inadvertently wearing down one side or the other
preferentially, as the aim is to maintain squareness of the cross section of the tab along its entire length.
The risk of abrading the flesh on your finger tips can be reduced if you attach the tab to some form of
rubbing block which can be grasped more easily.
After the operation is complete the surface of the tab will of course be rough matt in texture, but
desirably there should not be any really deep scratches. If there are, do not be tempted to rub further using this grade of paper. You will have to try and reduce them at later stages. Also check that you have left a skim of material over the fixing holes which commonly are found on the underside. Obviously the thicker
the skim the better. If you need to rub down so that the holes become exposed, the job is of course impossible, and it probably means the original depth of engraving was excessive.
Now repeat the operation twice more, using first medium then the finest grade of glass paper you can find. Be very gentle and take your time, as the object is no longer to remove material
in bulk but to start restoring the desired mirror finish. Such a finish cannot be obtained at this stage, though you will see a progressive improvement. Do not rub down excessively in the hope of getting a better finish. This is determined purely by the particle size of the fine paper, which will never produce the desired result on its own.
Next get some of the finest wet-or-dry carborundum paper you can lay your hands on.
Soak a sheet for at least fifteen minutes in tepid water, then place it on a perfectly flat surface. Again, a piece of MDF of substantial thickness can be used as it has a very good surface when new. However it swells and develops
pimples after a while when wet, so you must replace it from time to time. Manually, not using a machine, rub the tab on the wet paper until you feel that no improvement in surface finish is possible. Rinse the tab in water frequently. An attractive silky sheen should begin to appear when the tab is held against the light, which will compensate for all the hard work you have just undertaken in previous stages.
In fact, if you do not want a mirror finish, you could stop at this point and proceed to re-engrave (see below). Minor scratches and blemishes only visible at short range can largely be ignored unless you are very fussy, because they will not be seen by an organist under normal playing conditions. All he or she will be looking for are the stop names. But before leaving this phase of the work, rub the
corners of the tab very gently on the wet paper. These will have become unpleasantly sharp as a result of the preceding operations.
However if you do want a mirror finish, carry on as follows. Get a small buffing wheel mounted on an arbor suitable for an electric drill held horizontally in a bench jig. Alternatively you could
put the wheel in a lathe chuck if you have one. Such wheels are made of pieces of lapped cloth and are sold
widely in DIY places such as B&Q or model engineering stores. You will also need some buffing compound. There are a number of options here, but I use a
time-honoured material called Tripoli Brown. I
used to get it from G.L.R Distributors of Hoddesdon, though I believe they have
now ceased trading. However it is still widely advertised on the Internet. It comes in chocolate-brown
blocks which look exactly like Mars Bars, so you MUST keep your young children or grandchildren away from it!
If they see it, they will surely put it into their mouths. Tripoli Brown is mainly intended for metal buffing, and there are other
'colours' which might be better suited for use on plastics. I cannot claim to be an expert here, but it does
give excellent results if used as follows.
Usually the recommendation for buffing on a wheel is to use a slow speed. I am not sure how slow is slow, but in fact I have found that better results are obtained with plastics by using what I would consider a fast speed of about 2000 rpm. However you must use the lightest possible pressure or the
plastic material will heat up rapidly and melt.
Set the wheel spinning and then charge it with Tripoli Brown by pressing the bar onto the edge (not the face) of the wheel. You will be well advised to wear eye protection
and old clothes at this
stage as it spits all over the place. Now bring the tab up to the edge of the wheel very gently and buff until the surface attains a shiny mirror finish. Do not overdo it in view of the problem of overheating.
Recharge the wheel with buffing compound from time to time.
An optional final step is to polish the tab by hand using a metal polish for
brass such as Brasso or Duraglit
and a soft cloth. Silver polish is no good because it is not abrasive
enough, relying largely on chemical reactions with the silver to achieve its results. If things have gone well, you should now have a blank plastic tab with a finish quite the equal to that it had when new. The last time I undertook this operation I recovered 40 tabs
(i.e. 200 GBP worth or so) without the loss of a single one. It is admittedly time consuming, but you can streamline things by adopting a semi-production line approach - do 5 or 6 tabs at a time at each stage.
What about re-engraving? There are several options. You can of course have the blank tabs re-engraved professionally by a firm such as Kimber Allen. If the original tabs were of their manufacture they seem happy to bill you only their standard engraving charge per tab. If of a non-standard design they (or any other engraving specialist) might charge more. The quality of the resulting job will be very high, but it
is not the cheapest option - professional engraving will probably cost in the region of
3
- 5 GBP per tab depending on your choice of firm. If you follow this route be sure to request that the engraving is not done over the fixing
holes underneath. Usually there will be very little material left on top of these as a result of the operations described previously, and you would not want the engraving tool to expose them.
A much cheaper option is to re-letter the tabs yourself. Dry transfer lettering such as Letraset can give excellent results if you take your time and have an aptitude for this sort of thing. However the transfers will need fixing using commercial lacquer, so make sure this will not damage the plastic material. Try spraying some on the underside of a tab, or on a damaged one, first. As a matter of fact I am unsure that
the old-fashioned Letraset itself can be obtained any longer. I spent weeks looking for some
recently, but finally found a similar product called Edding Transfer at a specialist print shop. Their "ref 1002" sheets are in Helvetica Normal font, which is
an attractive sans-serif font suitable for most stop tab purposes. A similar approach is to use self-adhesive
transparent acetate sheets onto which you can print the
desired legends using an ordinary computer printer. Although I have not
followed this route myself, I have seen some tabs re-lettered in this manner and they look entirely authentic to the player.
Some
of the stop keys recovered in this
manner in two
of my consoles are pictured below. Both consoles contain around 40 old 'grained
ivorine' tabs. One is a three manual dual-purpose
organ (with both classical and theatre voices) in which the recovered tabs were
then re-engraved professionally. The other
is my experimental Prog Organ virtual pipe organ
console. Here the tabs were
left blank so that different stop names could be assigned to different simulated organs using printed labels hung above each group of stops, as shown in
the picture. At around 5 GBP per new blank tab, the cost
saving was therefore considerable in both cases - provided you have enough spare
time
available to do the job of course.
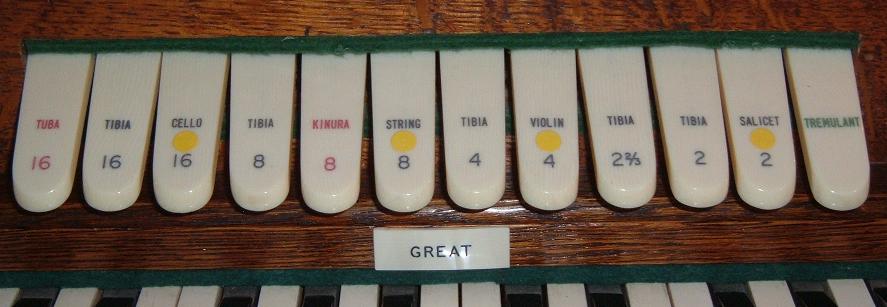
Re-engraved
recovered stop tabs in a dual-purpose organ
(classical and theatre voices)
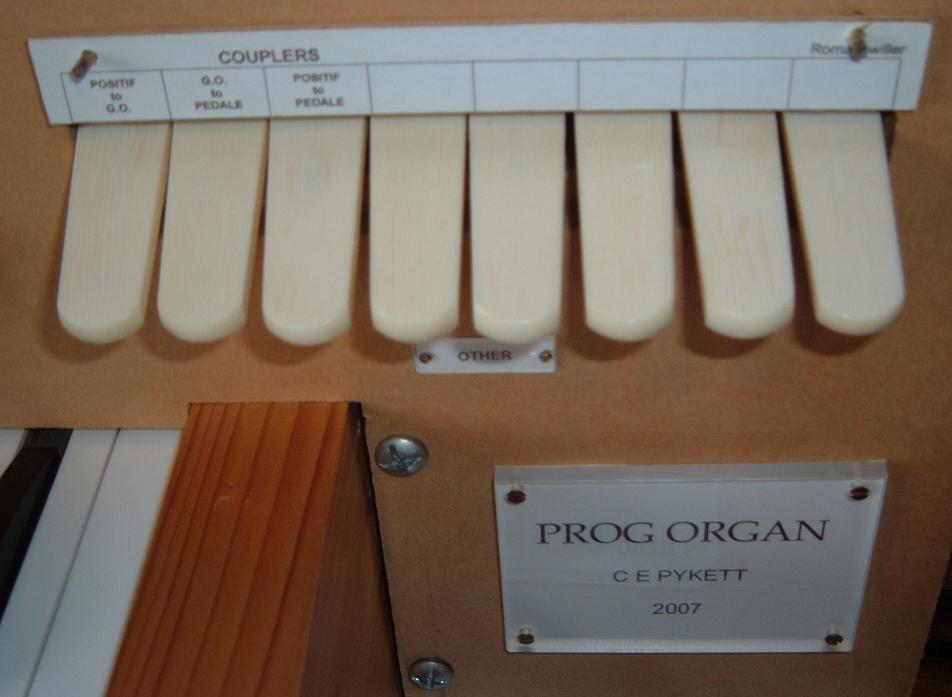
Recovered
stop tabs left blank in the experimental console used for the Prog Organ
virtual pipe organ